Friday, August 2, 2013

Camp Cook Box

Now to start thinking of  the Camping aspect of the trailer.
So far this is how I see it.  When the tailgate is removed it will be attached to the side of the trailer and used as an extension of the work/cooking area. Height of the table will accommodate a seating area. 
In side will be the "Cook Box" containing all of the cooking essentials as well as the dry food storage.
The lid of the box will hold the plates, utensils, paper towels, cups etc...
When open will be fixed upright while Kitchen is in use.
 
Not moving very fast at this point.  Have been trying to do design, how everything will fit and not end up with a 10 ton elephant.
A week ago at a garage sale I picked up an old Coleman Stove #413C that was made in 1947 for $. Kind of a Collector.   Had problems repairing the Generator, ( that's the thing that converts the fuel from liquid to a gas ).  Still working on that.
Anyway, Peg and I went Garage Sale'ing on Saturday and found another Stove , this on is a 413G that came out in 1974. and is just like new. Great buy at $10.00.  We also picked up a nice 2 person Dome Tent, the lady threw it in with the stove for free, nice Lady.

Today I spent assembling The bottom part of the "Cook Box".  On our Saturday adventure I also found an old "SENCO" Staple gun & Pin Gun Air Tools. Couldn't get the Staple Gun working but the Pin Gun works great.  I used the Pin Gun to assemble the box, should have gotten one of these long ago.    Now I need to figure out the top part, the lid and its contents.    Picture to come.
 
Here we are at the camp ground. 
The middle and right cubby holes have the stored items out and in use.  The Colman stove as you can see is in use where it is stored.   Normally we remove the stove and place in on it's own stand.  This allows you to use that shelf for things in use.

Monday, July 29, 2013

Smithwoods Vintage Trailer Open

Smithwoods Vintage Trailer Open House
 
This Saturday August 3rd 2013
 
Going to spend the better part of the day browsing through other peoples Camp Trailers.
It's always fun to see what others are doing with there projects. Who knows maybe some day I will be able to do the same.
 
Here are some pics from last years visit.
If your into Retro Trailers,
come on up.
4770 Highway 9
Felton, CA 95018-9623
10AM till 2PM


"Little Trailer" New project

After selling my pickup I thought that I had better fix up my little trailer for hauling stuff.  Also thinking of a bug-out trailer for camping.  With a cook box on the back and plenty of room for other camping gear, chairs, tent, firewood, ice chest,etc..

I need to figure out how to haul the boat latter.  
I decided to build it 24" high with back and thinking about a top.  
So far, 1 sheet ply 5/8,  and 1 sheet 1/2.
Today I dismantled the trailer to paint. Red.  Used stripper, sanded and prime red w/Rustoleum   Rust primer and finished Red.   
I'll assemble tomorrow.  Then epoxy the box for weather resistance.   Paint under side of box w/auto undercoating.  
The idea is to construct the box so as to be easily removable in panels.
More later.........


...............It is now later
 
More painting this AM.   Reattached the axel and springs. I'm going to replace these 8" rims with 12". There is just something strange thinking of the small tires going down the road.
 
Finished the painting on the frame and now painting the Tung of the trailer. 
Should be able to bolt it on later today. Then bolt on the bottom and epoxy the surface.  I hope the Epoxy is not to old, used it last when I built the Skiffs(15 yrs or so) 
 
Here is the photo progress so far.
Stripped down to the frame 
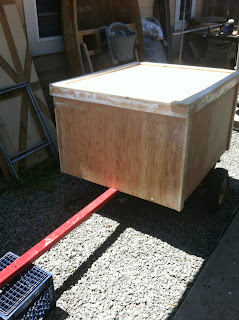
The beginning of the BOX

Frame painted andassembled
Waiting for the paint to dry.
The road side of the base
Still waiting for the paint to dry.
 
The metal was well rusted, as you can imagine. So a lot of wire brushing sanding etc.. 
I am using Rustoleum. The primer is for Rusty material. Covered well, so I won't have to worry about it down the road. Brushed on not sprayed.


 Well I decided to make a lid, so here it is. Now, Peg says that I need to also cover it with a tarp, I can do that.
 
 
The back drops in like a stake truck and when the lid is on it will stay put.


Yesterday we had some nice sunny weather so I decided to start with the epoxy.
Put a heavy coat on the floor and coated the lid and the tailgate. Much to my surprise it set up just fine. This AM I went over the same area with another coat.  The wood finish look pretty good , I may just leave it that way for a while. Although that means that it will be necessary to put on a finish coat with some UV protection.  Can't think of a trim color, maybe the Red I used on the frame I have plenty.
 

Thursday, June 27, 2013

The Shed, just another project


Our shed has always been something of a collection of things we hide. As usual, out of control. So I wanted to clear it out and fix it up. A usual I go overboard.  Sheetrock, insulation, change the door($25 Craig's list). A window ($30 HH) & floor covering ($.50sq.ft.HH)   from Habitat for Humanity. Paint (Left over from house).


It all started when I found this door on CL. 


I just couldn't stop. 


A little insulation


splash around some mud


Stick in a window


Throw on some paint (who put that bed in here).  Cover the floor.  


Back in with the shelving


How's that. Next will be an Awning and still need to vent (some day) .


Monday, June 24, 2013

Big changes the Back Yard

Big changes in the Back Yard area this Summer


The first thing was to take out the lawn and replace it with a low maintenance version.   Including a practice Putting Green. Not up to the standards of a usual golf Course , but its fine for practice.
The next was to recover the 5 chairs of the patio set. not a big job, but needed to be done.
Dealing with Goffers is always fun (haha), so, we dug up the back flower bed put in wire and then weed barrier and redwood chips.  put all the flowers in pots, with the appropriate watering system.
There are 2 planting areas left to give the Goffer treatment to,  that's for next year!
The last was to clean up the shed. So in my usual fashion I couldn't make it easy.  Insulation-sheetrock-a real door-window and floor covering.    Of course had to empty the room before work could be done.   Sort out the contents and return only the required keepers.   That left room for, you guessed it, " a bed ".  The bed will help offset the loss of the motor home when it goes.
So now we're ready for our usual 4th of July Contingency. 


Here is the process of replacing the old with the new. 


Saturday, January 26, 2013

Somthing NEW "Highlander"

Thought I would learn about blogging.
Things that I want to do.
  I would like my very much to acquire a small camp trailer .    My daughter Jennifer has just purchased a 19 foot Shasta   Starflyte.
 This is a little larger than I would like to get . .  I want something more than the 12 foot range possibly with a toilet. 
  This size is more suitable for towing by my new vehicle .
A 2004 Toyota Highlander.  
This is a great car for traveling, but not so good for around town (gas consumption wise).  
I would like to find a 60's Shasta, the 12' variety.  That way Peg & I, can call-a-vant around the country side. Camping as we go "Old Style".    Before that can happen, the Motorhome has to go.  That's going to be hard, we've had it for a long time and it has been fun & very convenient. There just is not enough space for both.