I think I'm too old , nevertheless embarking on a new project. This Canoe showed up on FB Marketplace for free. Just couldn't pass it up.
I think first seeing it, I must have been looking through Rose Colored Glasses. All I could see we're images of myself in years past when I dreamed of Canoe Camping.
It's 17 feet and built in 1926 by "Old Town" Canoe Co.. Wood framed with cedar and cedar planking the originally covered with canvas. At some point, more than likely in the 70's, was covered in fiber glass.
After getting it home and in the light where I could see better. It had some excessive damage. Most of the ribs are broken, many of the planks will need to be changed. On both ends where the guard rails come together, the high point of the canoe, severely damaged.
Where to start.
Well this is the way I found it
At first I thought that my Brother would love to get this. So, I brought it home to give it a once over and really started to get into the possibilities of doing it myself.
The covering was originally canvas. Some time in its life it had been re-covered with fiberglass. But, I think that if you start with the idea of restoring to original, the glass would have to come off.
It came off very easy without creating any further damage. Of Course now you can see all that was hidden under the glass.
Planking and frames would need replacing. Not an impossible job, but it would be challenging.
The first thing would be, to repair the ends where the framing and the deck plate comes together.
To do this part I first need to be able to bend the rail that runs on the inside to form the gunnel.
I'm going to use a length of 4" ABS pipe to soak the pieces so they can be bent over a form.
I'll use the propane burner and the pot connected to ABS 4" through the 1.5" to pump steam for bending as needed. (p.s. that didn't work, the ABS will melt)
Ended up making a Steam Box
and it worked fine.
I cut the bend form required out of a 2 x 12, attached some clamping. I tried this at first by just soaking, and it bent very easily. After it had dried for (3 days) I removed it. It sprung back, I'll need to over bend it some to make allowance for the spring back.
After the I get the pieces for the stern in wales bent, I'll remove the clamping and cut the other side to make the front bends. This way I wont lose the form for bending the outer rail.
Once the pieces are bent to the shape needed I will make a long splice to the existing Inwale.
Next will be to repair the deck plates. The ends have been damaged. I'll splice in a piece and shape.
Now the "Stem" needs repair. I'm not going to bend this piece. It will be cut to fit and secured to the bottom of the deck plate.
Now , all of these pieces come together to form the top point of the rails
In these photos you can see the piece made for repairing the Stern Stem.
One of my concerns is that I thought that I could loose the shape of the in wales if I were to remove the old ones before repairing the rib ends. I decided to work around the old in wales by leaving it attached to a couple of the ribs. I the repaired the other rib ends.
The next thing will be to install the new In-wales and secure the stem. Then reinstall the Deck.
The splice for the In-wale is going to be located between the hanger bolts for the seat. I decided to make it an extra long splice for more strength.
I want to make a comment about the glue I am using. It is "Gorilla Glue", I'm very happy with this stuff, very easy to use. Simply have to wet one surface with water and apply the glue to the other surface. The water seams to activate the glue, so, give it a couple minutes and then clean up the excess glue.
Cutting the old rib ends.
I thought this process out, I watched YOUTUBE videos of them being cut with a hand saw. So, I tried this out, not as easy as it looked. So I tried using my "Dremel Multi-Max", using the flush cutting tool.
This is, for me, the best way. It goes through the Cedar very easy, leaving a clean surface. I left the rib clamped to the in-wale while cutting, gives it more stability while cutting.
Now that the repair to the existing rib have been mad and secured to the in-wales
we fit and attached the Planks.
OK Folks, Buckle -Up, because this is the part of the process that will not be FUN.
I had to make the outer Gunwale with a splice at mid ship, could not deal with or find a piece if Oak 20 ft long.
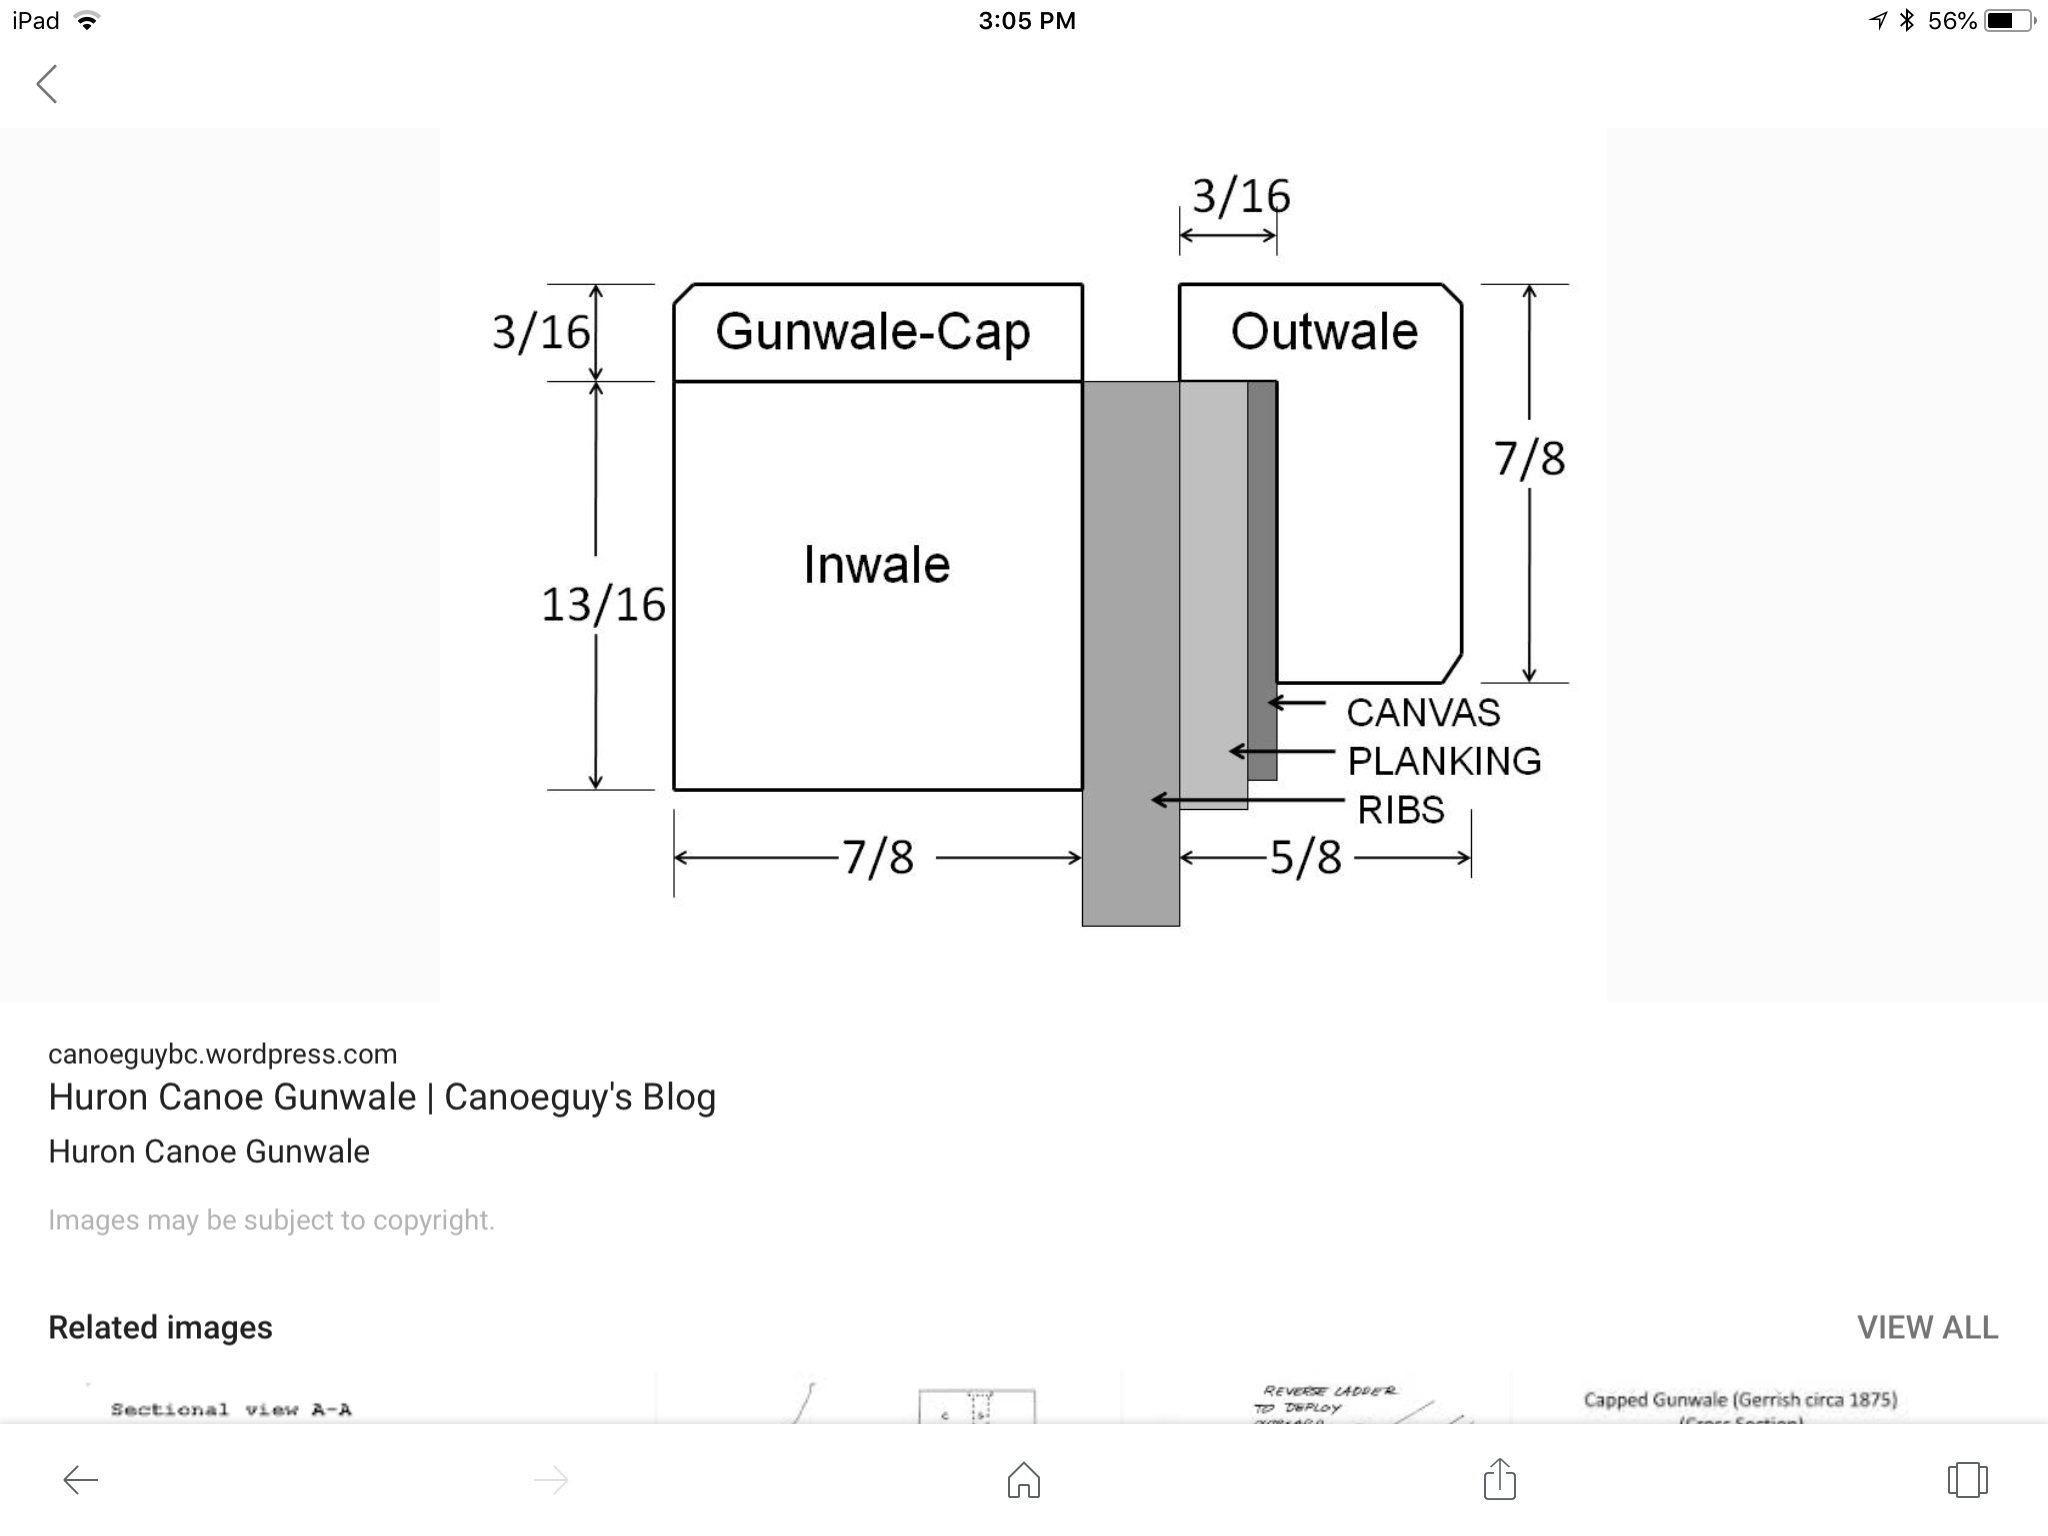
Here is a cross section diagram of the Gunwale for basic measurements
As you can see, I did not follow those guidelines. I was concerned that the top plank covering portion of the rail would be to fragile and could easily fracture.
With a height of 3/8" meant that it would be necessary to cut the planks 1/2" below the end of the Ribs.
Now, the hard part, to pre-fit the Outer Gunwale. Don't hurry this, it will go. If you can Steam the Ends back as far as you can and start from the end and clamp your way towards the middle.
Now that the rails are bent to fit, temporarily attach and create the splice.
(Whew, glad that's done)
TIME FOR THE CANVAS
I neglected to photograph this process, Sorry.
You need to have a secure point on each end to stretch the canvas too.
Now 3 coats of the Green
and for the Bright Work
Wala
The Finished Product
Hummm, what's next


.PNG)


